29 March 2013

Opel Corsa C 1.2 Z12XE 55 kW 2003

Changing of handbrake cables


Remove the handbrake gaiter and release cable A from the handbrake lever (10 mm. nut)


Underneath the car there is a heat shield which has to be undone in order to get to the connection between cable A and cable B. Unhook cable B.


There is another connection point, close to the brake drum. Unhook it to separate cable B from cable D on the left hand side. 


 Pull cable B out of the connection point which is located above the rear axle, on the left hand side.


Unhook cable C as well.

 
 There is another connection point for cable C, close to the brake drum.
 

In order to get to cable D. Remove the brake drum. A 27 mm nut is located underneath the metal lid, in the centre of the drum. Remove the retaining lock ring from cable D, on inside of the drum, unhook cable D and pull it out.


Remember to change the cable guides as well. Parts-number GM: 9191985 or Opel: 526701. These plastic guides will rub the plastic coating of your new cables, if they are slightly worn. If you have a problem with handbrake cables which are not releasing, it might be because of worn out guides.


Put the cables together in this order: 
put the 10 mm. nut in place on cable A
push cable A through the handbrake lever and the chassis
clip cable B together with cable A
slide cable B into the connection point at the rear axle
pull cable D (left hand side) through the drum, put the cable clip in place and hook the cable inside the drum
clip cable B together with cable D (left hand side)
slide cable C into the connection point at the rear axle
pull cable D (right hand side) through the drum, put the cable clip in place and hook the cable inside the drum
clip cable C together with cable D (right hand side)
adjust nut at the handbrake lever


10 March 2013

Opel Corsa C 1.2 Z12XE 55 kW 2003

Cleaning and fixing a slow retracting seatbelt.

Front Seat Belt, Remove and Install (Model F 68)

Remove upper inner panelling of B-pillar. There is a TX25 screw underneath the plastic cover.


Detach guide fitting from seat belt height adjuster (blue square).
Pull carefully to release the plastic clips (yellow circles).


Remove inner panelling lower B-pillar.
Pull carefully to release the plastic clips (yellow circles).


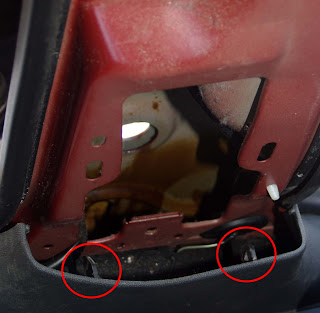
Two plastic pins are holding the floor panelling and the lower B-pillar panelling together. (Red circles on the photo above and the red circles on the photo below.) Move the pins to the side in order to release the hooks.


Detach reel retractor from B-pillar. A 13 mm. nut is reached through a hole from the outside of the vehicle. A plastic cover has to be removed in order to see it. You can see a photo of the reel retractor with the bolt, below. A special tool is required. (GM tool KM-6008-A or like the one I got)
 

Unscrew bolt from seat belt height adjuster (TX 50).
I sprayed some silicone on to the seat belt height adjuster guide. In my case it fixed the slow retracting seatbelt. It could be wise to use a 600 grit sandpaper first, in case there are some "marks" in the plastic guide.


Detach cover from front seat panelling


Pull the seat panelling in order to release the panel (yellow circles above and under) and unhook the panel (red circles above and under).  Unscrew bolt to detach seat belt from front seat frame (TX40).


Inside the reel retractor. (Red circle) to release the belt before extracting. The other side of the reel retractor contains a spring coil. Be careful not to open it.


I left the seatbelt overnight in a bath of soap and water before I brushed it with a soft brush. It was well worth it. :) I think the previous owner was a coal miner which never washed his hands :)


5 March 2013

Reconditioning an office chair

A "tired" office chair in need of some reconditioning.

The seat cushion was in a terrible condition, as you can see from the picture.


I removed the back cushion which was locked with actuator for hight adjustment.
The next step was to remove the plastic moulding from the back cushion. 3 Phillips screws were removed and the moulding could be pushed upwards in order to unhook 2 tabs. The upholstery was stapled to a wooden board with a lots of staples. I removed them with a screwdriver and pliers.


New fabric was stapled to the wooden board using a staple gun.

I did the same to the seat cushion, after removing the swivel chair base, arm-caps and plastic moulding.

Swivel chair base, 4 Phillips (PH 3) screws.
Arm-caps, 2 Phillips (PH 3) screws on each of them.
Plastic moulding, 3 Phillips (PH 1) screws.


 Result: a new chair after a little DIY.