30 December 2015

Alternativ løpesko for vinter og is.

Løpesko for vinter og is.

Jeg kjøpe meg et par Icebug løpesko i den tro at det ville løse alle problemer for løpetrening på is og glatt underlag. Etter å ha brukt dem noen ganger var jeg slett ikke fornøyde med dem. Godt grep på isen men veldig stive i sålen og forholdsvis tunge. I det store og hele så gav de et veldig dårlig løpesteg.

Det var på høy tid å være litt kreativ.

Mine Reebok løpesko ble utsett som prøveobjekt.

Jeg kjøpe en pakke med 4,2 x 13 mm. boreskruer. 35 kroner for 250 stkBorende og gjengedannende plateskrue med 1/4" sekskanthode kombikryss med vingeskive.


Det tok meg mindre enn 3 minutter å skru inn 7 skruer i hver sko.


Jeg var veldig spent på om dette kom til å fungere. Skulle jeg kjenne skruene i gjennom sålen?.I tilfelle det skulle bli problemer underveis så la jeg en liten stjerneskrutrekker i lommen, før jeg la av gårde på en 10 km. løpetur.


Resultat: Etter 10 km. løpning i 4 min./km. fart var resultatet over all forventning. Jeg kjente ikke noe til skruene inne i skoen. Alt kjentes og føltes som normalt borsett fra at jeg hadde fått et veldig bra grep på isen. Alle skruene satt fremdeles på fast. Min konklusjon er; å kjøpe dyre spesialsko med pigger er unødvendig. Vil jeg ikke ha piggene i lengre så skrur jeg dem bare ut igjen og så er skoene tilbake til hva de var i utgangspunktet.


15 May 2015

Changing battery in a Braun Oral-B electric toothbrush

The motor seemed to be fine but "lazy" due to a poor battery.

I've always had the idea to try to repair "things" before I throw it away. It is more or less a challege I've given myself. This was also the case this time :)

I used a big flatheaded screwdriver to turn the bottom of the thootbrush 45 degrees counterclockwise.


Push the motor/battery assembly out like its shown on the photo (red arrow).


Unsolder four points. 3 x for the motor (green circle) and 2 x for the battery (red circle).


Lift the pcb away and pull or lift the battery out of the plastic holder. Notice where the thin wires from the charing coil is running!


The order of the bottom assembly is coil spring, chipboard washer, coil, rubber washer, plastic cover


The battery I used is a Sanyo 14x50 mm. 1,2V NiMH, 1500 mAh rechachable.


Notice that the + on the battery should be towards the motor. Use a multimeter to find +/- on the battery.

Put the battery in place and solder the motor and the battery to the pcb. Make sure the thin wires from the coil is ok.

6 May 2015

Only 4 of 45 woodpaint products get approved in Swedish test.

And half are so full of mold and algae that they discouraged.

I wrote about Jotun wood paint a couple of years ago.
http://jb-service.blogspot.se/2013/05/jotun-wood-paint-and-wood-cleaner.html

Now the Swedish insurance company Folksam has tested 45 paints over two years.

The aim was to test the quality of products, so that consumers can make good choices. The results are discouraging: Only 4 of 45 products get approved. - This is the worst result ever since Folksam started testing outdoor colors, writes Folksam in the test report.

This is the fifth test in a row from Folksam , and the 45 types of paint are tested at four locations in the country for a period of two years. All products are evaluated on both function, as well as environmental and health aspects.

There are so few products that meet the criteria for function and environment which is a dissaster for manufacturer. Painting a house is an expensive project and choosing a bad product makes it even more expensive, writes Folksams paint expert Stefan Hjort in the report. More than half of the products are so full of mold, algae or other problems after two years, that Folksam completely discourages purchasing them. Three of the products were already halfway through the test over the limit of acceptable mold growth. Folksam states that the reason for even poorer performance compared with previous years, may have been a more favorable climate for microorganisms, and that this test includes multiple low colors than before. Here you can find the entire test with test results, and you can check if the paint you use is included.

The best products

The test was conducted in the period 2013 to 2015, and each product is tested on 24 panels divided into four test stations from south to north, as well as a reference panel per color stored indoors. The products were rated "good choice", "doubtful choice "or" not recommended." The test winners are classified as "good choice" for function / durability and the environment:

Beckers Akrylatfärg Max

Beckers Perfect Akrylatfärg

Falu Vapen Fasadfärg

Alcro Consist Täckfärg

The four listed products are the only ones that passed both the function / durability and environmental / health test, but there are several that get passed the function / durability. Nine products are overall good choices when it comes to durability. In addition to the ones mentioned before, these are good choices when it comes to durability.

Falu reds (linseed oil-based paints)

Flügger 100 Aqua (top coat)

Flügger 98 Aqua (deck stain)

Gjøco manor Maximal (top coat)

Hornbach / Schulz uteakrylat (top coat)

The list of paint and stain that gets stamped "not recommended" is long. Note that many of these products promise things like "Protection for up to 15 years" (ex. from Rustas Premium Fasadfärg/facade paint). These products are the same which have so much mold and algae growth after two years that you are discouraged from buying them.

Here are products that are not recommended by Folksam, after two years of testing.

 
Manufacturer
Product
Cuprinol
Fasadlasyr
Beckers
Perfect Oljefärg
Rusta
Premium Fasadfärg
Teknos
WOODEX Aqua Solid
Alcro
Modern Oljefärg
Beckers
Perfect Täcklasyr
Teknos
Tranemo reds
Alcro
Fasad Täcklasyr
Beckers
Tradition reds
Beckers
Fasadfärg Easy
Rusta
Oljefärg V
Kulturhantverkarna
Linoljefärg Fasad
Caparol
Carat Oljefärg
Engwall & Claesson
Fasadmatt
Ottosson Färgmakeri
Linoljefärg
Flügger
95 Aqua trälasyr
Teknos
Nordica Eko
K-rauta / Cello
Wintex
Jotun
Ultimate
Sigma
Sigma Life DÆK Extreme
Cuprinol
Fasadfärg Plus
Nordsjö
Tinova VX +
ÖoB / FärgLab
Housing color
Bauhaus / Swing Color
Oljefärg V
ÖoB / FärgLab
Oljefärg
Jula / Färgstaven
Träfasad / oljefärg


26 April 2015

Changing battery on a Citroen key fob.

2003 Citroen Berlingo key fob.

1. Pry it open with a flat-headed screwdriver.


2. Push the battery in the direction of the red arrow. You will need a CR 2016 battery for replacement.


This picture shows where the RFID tag is on the PCB. There is an antenna near the ignition-switch which "wakes up" the tag and reads it. The information from the RFID is used for the cars immobilizer system.   


12 April 2015

TomTom GO 730 touch screen not responding.

The touch screen was not responding.This repair guide is valid for other TomTom GPS as well. Ex. GO 530, GO 720, etc.


No response when touching the screen. Can't get passed the start screen.


Remove the 2 small torx screws at the rear of the unit. (green circles) 


Pry the unit open. I used a "sharp" plastic piece (light blue) which does not scratch the unit.


The unit opens like the picture below.


Open the lock (green arrows) keeping the flat cable in place and pull the cable in the direction of the blue arrow. Be careful!


Remove the display assembly from the rest of the unit and pry the black frame away from the assembly.


Remove the rubber seal from the LCD.


Remove the LCD/display from the rear frame and replace it. The LCD for this unit is the same as GO 530, GO 720 and GO 730.


Put the unit together again in reverse order.

7 April 2015

SAAB 9-3 SE 2.0T,1999, fuse 29 keep blowing.

 SAAB 9-3 SE 2.0T, 1999 fuse 29 keep blowing and a complete "meltdown" of wire harness to the tailgate.


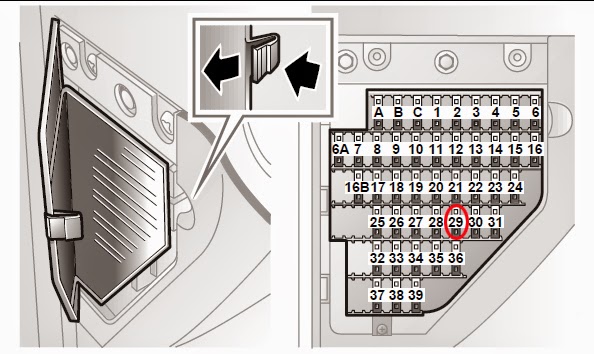
Fuse 29 (10A): Tail light right and number plate light.

Why do fuses blow?
Short circuits, overloading, mismatched loads, or device failure are the prime reasons for excessive current. A fuse interrupts excessive current ("blows") so that further damage by overheating or fire is prevented.
In this case a 40A fuse was installed instead of the 10A which should be there. It led to the cables to the tailgate melting together in one solid metal wire.

Not so good.

Never replace a fuse with higher Amp (A) then what is original.

First to the problem causing the fuse blowing:

Remove the tailgate cover. 4 x torx 25 (red circles) and a few clips (green circles). Push the center of the clip and pull it out.


Remove the 2 x 10 mm. nuts (red circles) inside the tailgate and disconnect the cable to the boot/trunk release, license plate light assembly.


Remove the 2 tail lights. Red circles are 10 mm. nuts and then push at (green circles) to release the lamps from the tailgate.


Remove the 2 x 25 torx bolts (green circle) from the boot/trunk release, license plate light assembly.


2 x clip holds the boot/trunk release, license plate light assembly now in place (green circles).


Here you can see the reason for the short-circuit. Water and road salt has come through the hole (green circle). The salted water has corroded the metal wire and destroyed the wire insulation.
 

I replaced the old wires with new ones. Filled the hole with silicon and "glued" everything together with silicon.

Install in reverse order.

The next problem I had to take care of was to replace the melted wire harness.

I went to the scrapheap to get hold of a wire harness from another Saab. I planned to connect it to the old harness behind the roof lining. 14 wires are in the harness to the tailgate.
Here is the "new" wire harness.


I removed the plastic part on the left of the tailgate window. 3 x clips (red circles)  and 1 screw (green circle).


5 x clips (green circles) holds the plastic part at the top of the tailgate.


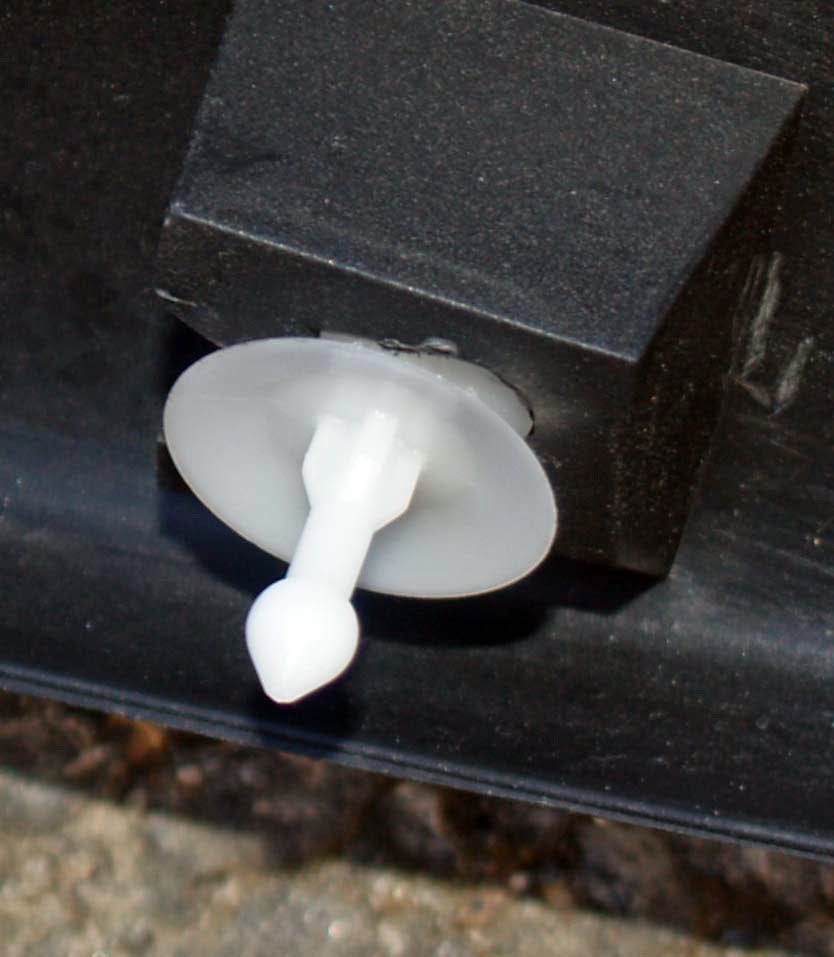
2 x white clips holds the roof lining in place. Just pull them out and place something in between in roof lining and the roof. It makes it easier to handle the cables.


I then removed the rear speaker cover. 5 x torx 25 (green circles).


Then the white cover around the left rear triangular window. 5 x clips (green circles).


I replaced the old melted wire harness with the "new" one. Pulled it through the 2 plastic holders  the plastic tube and underneath the roof lining. Here I soldered it together with the old wire harness. The reason for connecting it here was the fact that the rest of the wire harness seemed to be ok. It was just the green/white cable to the right tail light and number plate light which was melted from here and forward in the car.


I pulled a new red cable as shown on these pictures.


Rear left door:


Front left door:
From here and forward the old green/white cable was ok.


JB Service shop


SHOP:

I accept Paypal (Visa, Mastercard, American Express and other credit and debit cards) as payment.


Used Citroen Berlingo ECU PSA:9650359580   REF SOFT:9650360480
Price: 1 000 SEK (Swedish crowns) + P&P

Used Mercedes ECU, A0265456932  Bosch: 0261206303  HW48.99
This unit is not stable.
Price: 500 SEK (Swedish crowns) + P&P


Used VAG 120A alternator 074903025J
This unit is completely refurbished.
Price: 1 500 SEK (Swedish crowns) + P&P

Used VAG 90A alternator
OE:
Bosch: 0120485038, 0123320001, 0123320007, 0123340003, 0986038370, 3837
Lucas: LRB00 147, LRB 147
Valeo: A13VI 124
The unit is remanufactured
Price: 1 500 SEK (Swedish crowns) + P&P

1 April 2015

Mercedes W107, 350 SL, 1972

Mercedes W107, 350 SL, 1972, not starting.

It turned out to be a very simple problem. A lots of "rubbish" in the fuel pump, fuel filter and fuel line. After flushing the fuel pump and fuel line with some new petrol and changing the fuel filter, it was ok. In the process I found some information that might be useful for someone else.


Fuel pump and filter are located at the rear right hand side, close to the fuel tank.


Fusebox: Right hand side, behind the foot panel, beside the door.


1. Automatic antenna
2.
Parking, boot (trunk) light, glove box light , entrance lights, hazard warning lights
3.
Radio
4.
Passing light
5. Wind shield wiper, w
ind shield washer pump, Horn, cigar lighter
6. Empty
7. Blower motor

8. Kombi-instrument, turn signal, backup light
9. Electrically operated fan, air conditioning
10. Stop lamp, starter relay
11. Rear window heater
12. Automatic t
ransmission
13. Parking light right, tail light right, license plate light, dash board lightning
14. Main relay, fuel pump relay
15. Fog light
16.
Parking light left, tail light left 
17. Head light high beam right, head light high beam indicator
18. Head light high beam left
19. Low beam right
20. Low beam left


Relays: (Above fusebox)


1. Fuel pump
2.
Starting valve
3.
Electronic system
4.
Starter terminal 50
5.
Air conditioning
6. Supplementary fan

Mercedes part number: 0015420219